
 Define Your Why
- Define Your Why


Become a Lore Mapper
Follow these steps to plan your interview, record the stories, and post your Chat Map
What ignites your passion for capturing this person's stories?
Is it a school project?
Do you yearn to connect with a neighbor or family member on a deeper level?
Perhaps you aspire to make a positive impact in your community.
Identifying your purpose and keeping it at the forefront of your effort will guide you throughout the lore mapping process.

Your goal is to lead the chat and get them to share what they have experienced.
Listen attentively, posing questions to steer the dialogue towards your objective or to keep them engaged in their storytelling.
Remember, you are not conducting a survey but an interview or chat. Use your questions to help your storyteller keep talking. Some storytellers have plenty to say and you will not get a chance to use some of your questions. That is okay. If the conversation goes off target, recall the subjects that you want to learn about in the neighborhood.
What subjects are you studying in the neighborhood where you are researching?
Click here and follow the instructions on the next page to customize your question list. Be sure to copy good questions onto your consent form below.
Note! If your class has a set of questions from your teacher, use those questions
Who holds the key to unlocking the stories you seek?
Is it a wise elder in your family or a neighbor who has witnessed the neighborhood's transformation over time?
Reach out and connect with them!
Explain your purpose (remember your "why" from earlier) and explain how their participation may be helpful in shaping the future of the neighborhood.

Explain your storyteller's rights.
Their story is their own intellectual property, and you're simply recording it.
They have the right to opt-out at any point in the process, without any explanation or pressure.
Information you will need before you create your consent form:
- Your email address, or if under 18 years old the email of your teacher or legal guardian
- Your project name or class name, if applicable
- Your class name
- Your teacher's name, if applicable
- Your school's name, if applicable
- Sample questions to ask your storyteller (earlier section)
- Your project purpose
- Your phone number, or if under 18 years old the phone number of your teacher or legal guardian
If you are UNDER 18-years-old and making this form for a class, click here to build your consent form.
If you are UNDER 18-years-old and making this form for personal use, click here to build your consent form.
If you are OVER 18-years-old and making this form for personal use, click here to build your consent form.
If you are OVER 18-years-old and making this form for a class, click here to build your consent form.
A copy of your draft consent form will be emailed to the address you provided. Print two copies, and get your storyteller to sign both copies. One is for them to keep and one is for your records.
Be mindful of your storyteller's valuable time.
- Coordinate a convenient schedule for the interview.
- Estimate the amount of time you need for the interview (usually between 30 to 90 minutes).
- Offer to send them the consent form with the questions beforehand so that they can gather their thoughts and prepare for the conversation.
- Consider having refreshments on hand, like water or tea, to create a comfortable and relaxed atmosphere.
- Stay aware of your own safety: tell a friend or your teacher when you go to an chat, where you are going, and who you are chatting with.

You need two software tools: a recorder and a mapper
1. Your first goal is to capture the voice and the transcript of your chat.
Visit Otter.ai and download what you need for your device
The recorder you choose will depend on your mobile technology. As of January 2025, we recommend Otter.ai for most languages (Evernote has even more languages, but does not provide time stamps or speaker transitions and offers a total of 1 hour per recording). It is free to download. It allows you to record the chat, and it will auto-transcribe 30 minutes of a conversation for free. You must restart the recorder after 30 minutes (set an alarm on your phone for 28 minutes) in order to get another free 30-minute period and to be sure that it will auto-transcribe the whole conversation.
2. Your second goal is to ensure you capture the locations or "settings" of each story in your chat.
As the Lore Mapper, you should use is Open Street Map (for either Android or Apple). This map is not owned by a company, and your data is stored locally on your own device.
This platform is an open-source map and it is supported by thousands of volunteers. Many places have street-view imagery when you activate the Mapillary plugin, which may be helpful in jogging your chat partner's memories. NOTE: download only the map area you will be having a conversation about. Open Street Map offers several free maps, but if you download more than the limit, you will have to pay for the service.
Always plan for the unexpected!
Assume your primary recording device might malfunction and have a backup recorder running simultaneously.
A good strategy is to use a tablet or computer for capturing both audio and the map.
Your secondary device, like a phone, can serve as an additional audio recorder.
Remember to test your equipment thoroughly before the interview.

What ignites your passion for capturing this person's stories?
Is it a school project? Do you yearn to connect with a neighbor or family member on a deeper level? Perhaps you aspire to make a positive impact in your community.Identifying your purpose and keeping it at the forefront of your effort will guide you throughout the lore mapping process.
Your goal is to lead the chat and get them to share what they have experienced.
Listen attentively, posing questions to steer the dialogue towards your objective or to keep them engaged in their storytelling. Remember, you are not conducting a survey but an interview or chat. Use your questions to help your storyteller keep talking. Some storytellers have plenty to say and you will not get a chance to use some of your questions. That is okay. If the conversation goes off target, recall the subjects that you want to learn about in the neighborhood. What subjects are you studying in the neighborhood where you are researching?Click here and follow the instructions on the next page to customize your question list. Be sure to copy good questions onto your consent form below.Note! If your class has a set of questions from your teacher, use those questions
Who holds the key to unlocking the stories you seek?
Is it a wise elder in your family or a neighbor who has witnessed the neighborhood's transformation over time?Reach out and connect with them!
Explain your purpose (remember your "why" from earlier) and explain how their participation may be helpful in shaping the future of the neighborhood.
Explain your storyteller's rights.
Their story is their own intellectual property, and you're simply recording it. They have the right to opt-out at any point in the process, without any explanation or pressure.Information you will need before you create your consent form:
- Your email address, or if under 18 years old the email of your teacher or legal guardian
- Your project name or class name, if applicable
- Your class name
- Your teacher's name, if applicable
- Your school's name, if applicable
- Sample questions to ask your storyteller (earlier section)
- Your project purpose
- Your phone number, or if under 18 years old the phone number of your teacher or legal guardian
If you are UNDER 18-years-old and making this form for a class, click here to build your consent form.
If you are UNDER 18-years-old and making this form for personal use, click here to build your consent form.
If you are OVER 18-years-old and making this form for personal use, click here to build your consent form.
If you are OVER 18-years-old and making this form for a class, click here to build your consent form.
A copy of your draft consent form will be emailed to the address you provided. Print two copies, and get your storyteller to sign both copies. One is for them to keep and one is for your records. Be mindful of your storyteller's valuable time.
- Coordinate a convenient schedule for the interview.
- Estimate the amount of time you need for the interview (usually between 30 to 90 minutes).
- Offer to send them the consent form with the questions beforehand so that they can gather their thoughts and prepare for the conversation.
- Consider having refreshments on hand, like water or tea, to create a comfortable and relaxed atmosphere.
- Stay aware of your own safety: tell a friend or your teacher when you go to an chat, where you are going, and who you are chatting with.
You need two software tools: a recorder and a mapper
1. Your first goal is to capture the voice and the transcript of your chat.
Visit Otter.ai and download what you need for your device The recorder you choose will depend on your mobile technology. As of January 2025, we recommend Otter.ai for most languages (Evernote has even more languages, but does not provide time stamps or speaker transitions and offers a total of 1 hour per recording). It is free to download. It allows you to record the chat, and it will auto-transcribe 30 minutes of a conversation for free. You must restart the recorder after 30 minutes (set an alarm on your phone for 28 minutes) in order to get another free 30-minute period and to be sure that it will auto-transcribe the whole conversation.2. Your second goal is to ensure you capture the locations or "settings" of each story in your chat.
As the Lore Mapper, you should use is Open Street Map (for either Android or Apple). This map is not owned by a company, and your data is stored locally on your own device. This platform is an open-source map and it is supported by thousands of volunteers. Many places have street-view imagery when you activate the Mapillary plugin, which may be helpful in jogging your chat partner's memories. NOTE: download only the map area you will be having a conversation about. Open Street Map offers several free maps, but if you download more than the limit, you will have to pay for the service.Always plan for the unexpected!
Assume your primary recording device might malfunction and have a backup recorder running simultaneously.
A good strategy is to use a tablet or computer for capturing both audio and the map. Your secondary device, like a phone, can serve as an additional audio recorder.Remember to test your equipment thoroughly before the interview.
Head to the Chat!
You are now fully prepared for your chat, so what do you do once you are in front of your storyteller:
- Test your recording equipment (microphone, recorder, software).
- Ensure sufficient recording space and battery life or an electrical connection.
- Choose a quiet location with minimal background noise.
- Start your backup recording equipment.
- Place your primary recording device between you and the storyteller. Staying within a half meter (2 feet) will help with recording quality.
- Go over the consent form and ask if there are any questions before you begin.
- Have a "jot-pad" and pen within reach for jotting down notes about interesting subjects.
- Start your primary recorder and speak the following:
"Today is (say the date), and this is an interview with (full name of the storyteller) who lives at (say their address). We are making this recording for (say your project name or purpose). The interviewer is (say your own name). (Again state the name of the storyteller), do you understand we are recording your story for use in research and community heritage?"
- Thank them, and begin with your first question, usually:
"When did you move to this neighborhood?"
- Note: Since you have a limited number of transcription minutes per recording with your software, set an alarm now to give you a full minute to restart the recorder. Then set the alarm again!
To craft a captivating chat map, pinpoint the settings mentioned in the story.
When your storyteller mentions a specific place, ask about location details.
Watch the process by clicking here or follow these steps:
Flag a Story Video Tutorial
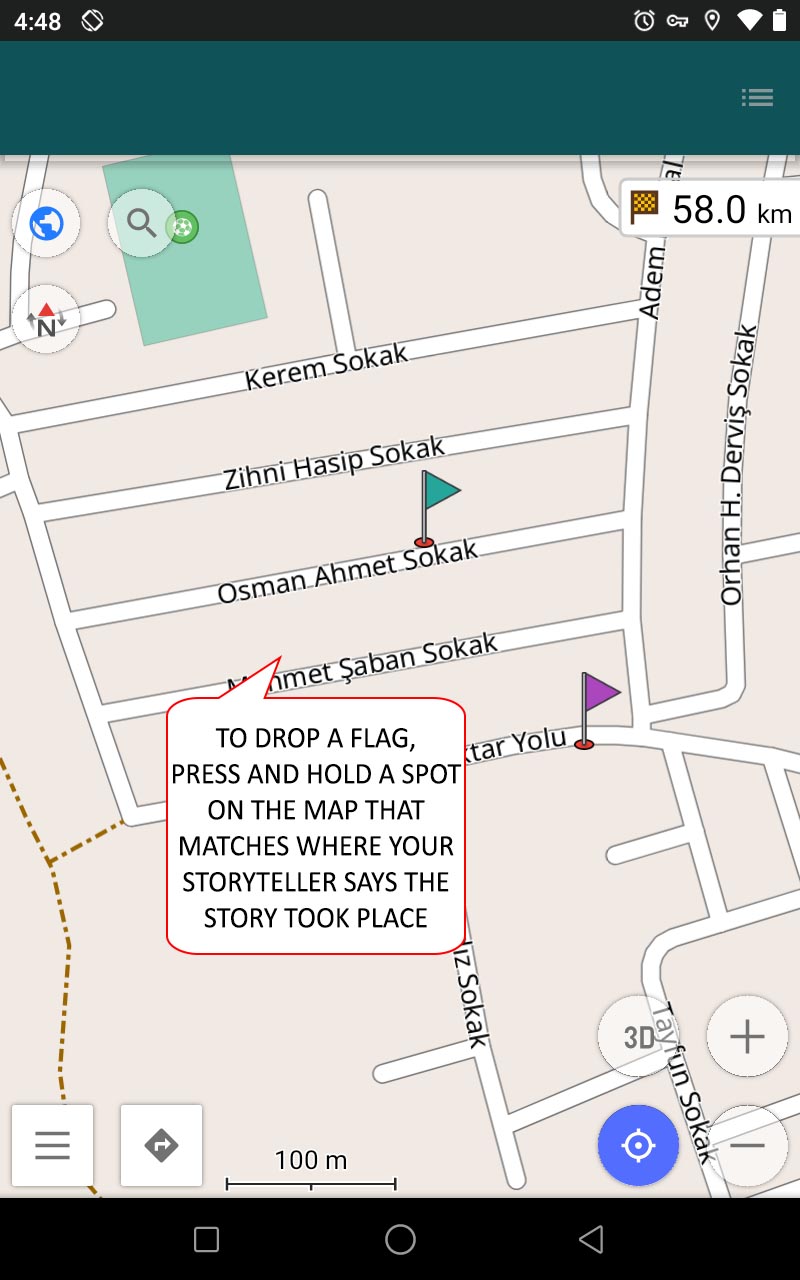
Briefly press and HOLD your finger on the map to drop a flag.
Choose a location central to that part of the story: a street corner, a building, be accurate
Check with your storyteller to confirm if they agree with the location.
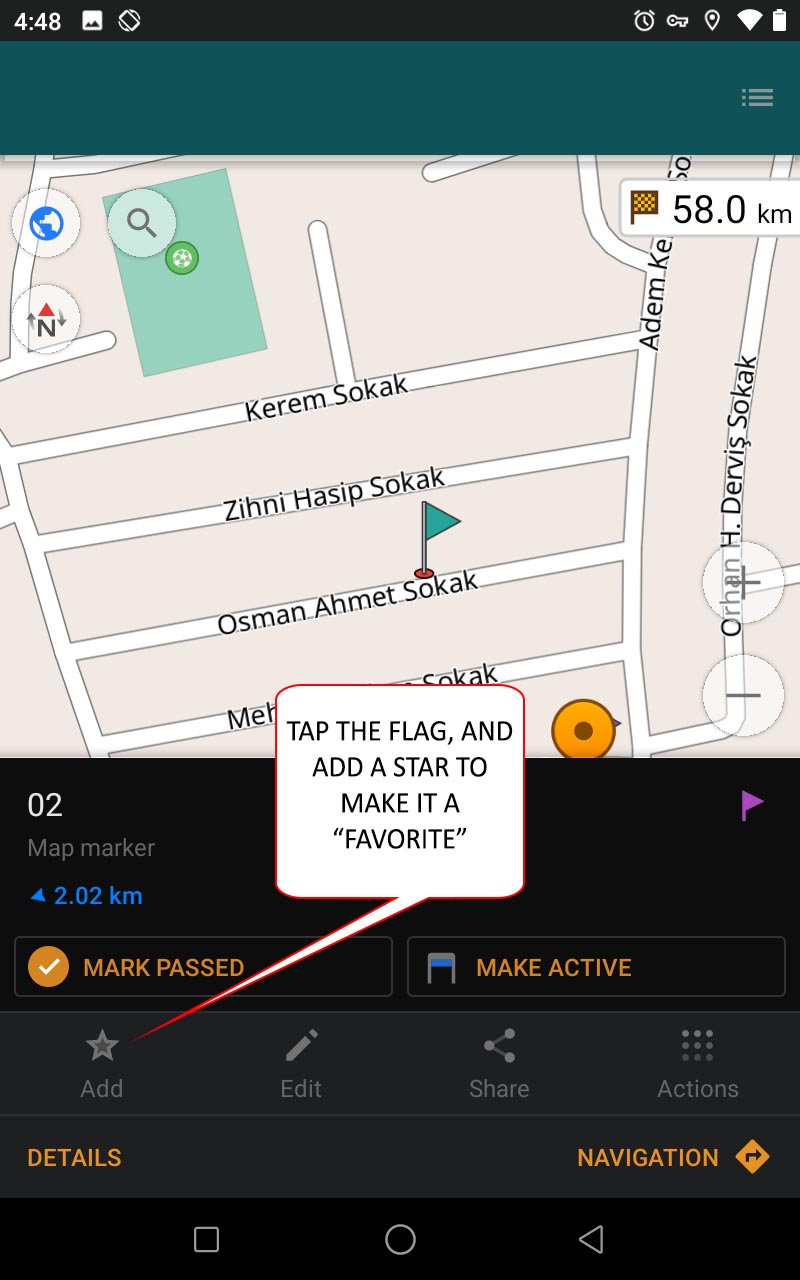
Then tap the flag to open its menu.
Make the flag a favorite
Assign a number to the flag

Speak the number of the pin into the recorder so it is easy to find in your transcript later!
Make a new "category" for your map and change the name to your storyteller's name:
Make a Folder Tutorial
Be_sure_to_use_underscores_in_the_name, not spaces (the mapping software does not work with spaces)
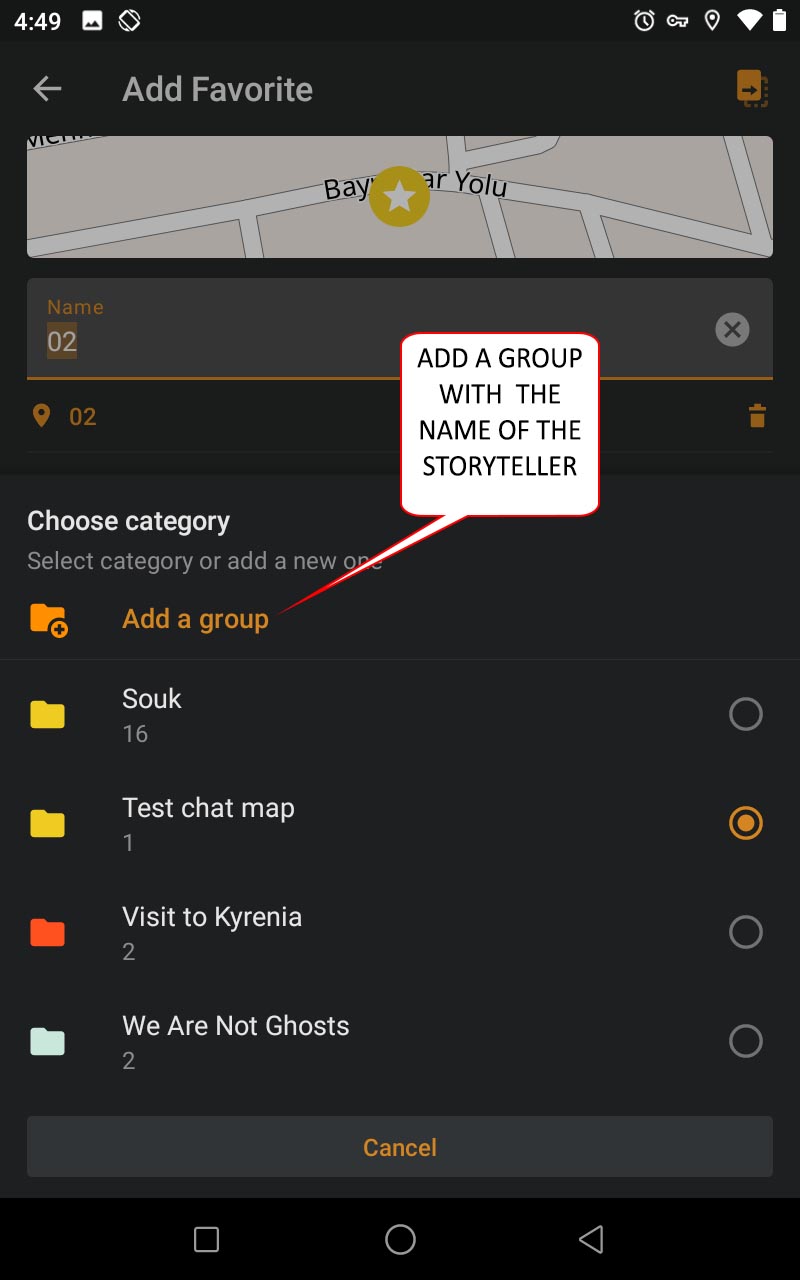
Make a flag for each location mentioned in the story, and double check that all flags have the same category name.
Resume the conversation
- Thank your storyteller again.
- Stop your recording on both recording devices.
- Pack up your copy of the consent form.
- Check that you take all your equipment with you.
- Test your recording equipment (microphone, recorder, software).
- Ensure sufficient recording space and battery life or an electrical connection.
- Choose a quiet location with minimal background noise.
- Start your backup recording equipment.
- Place your primary recording device between you and the storyteller. Staying within a half meter (2 feet) will help with recording quality.
- Go over the consent form and ask if there are any questions before you begin.
- Have a "jot-pad" and pen within reach for jotting down notes about interesting subjects.
- Start your primary recorder and speak the following:
"Today is (say the date), and this is an interview with (full name of the storyteller) who lives at (say their address). We are making this recording for (say your project name or purpose). The interviewer is (say your own name). (Again state the name of the storyteller), do you understand we are recording your story for use in research and community heritage?"
- Thank them, and begin with your first question, usually:
"When did you move to this neighborhood?"
- Note: Since you have a limited number of transcription minutes per recording with your software, set an alarm now to give you a full minute to restart the recorder. Then set the alarm again!
To craft a captivating chat map, pinpoint the settings mentioned in the story.
When your storyteller mentions a specific place, ask about location details. Watch the process by clicking here or follow these steps:Flag a Story Video Tutorial
Briefly press and HOLD your finger on the map to drop a flag.
Choose a location central to that part of the story: a street corner, a building, be accurate Check with your storyteller to confirm if they agree with the location.
Then tap the flag to open its menu.
Make the flag a favorite
Assign a number to the flag
Speak the number of the pin into the recorder so it is easy to find in your transcript later!
Make a Folder Tutorial
Be_sure_to_use_underscores_in_the_name, not spaces (the mapping software does not work with spaces)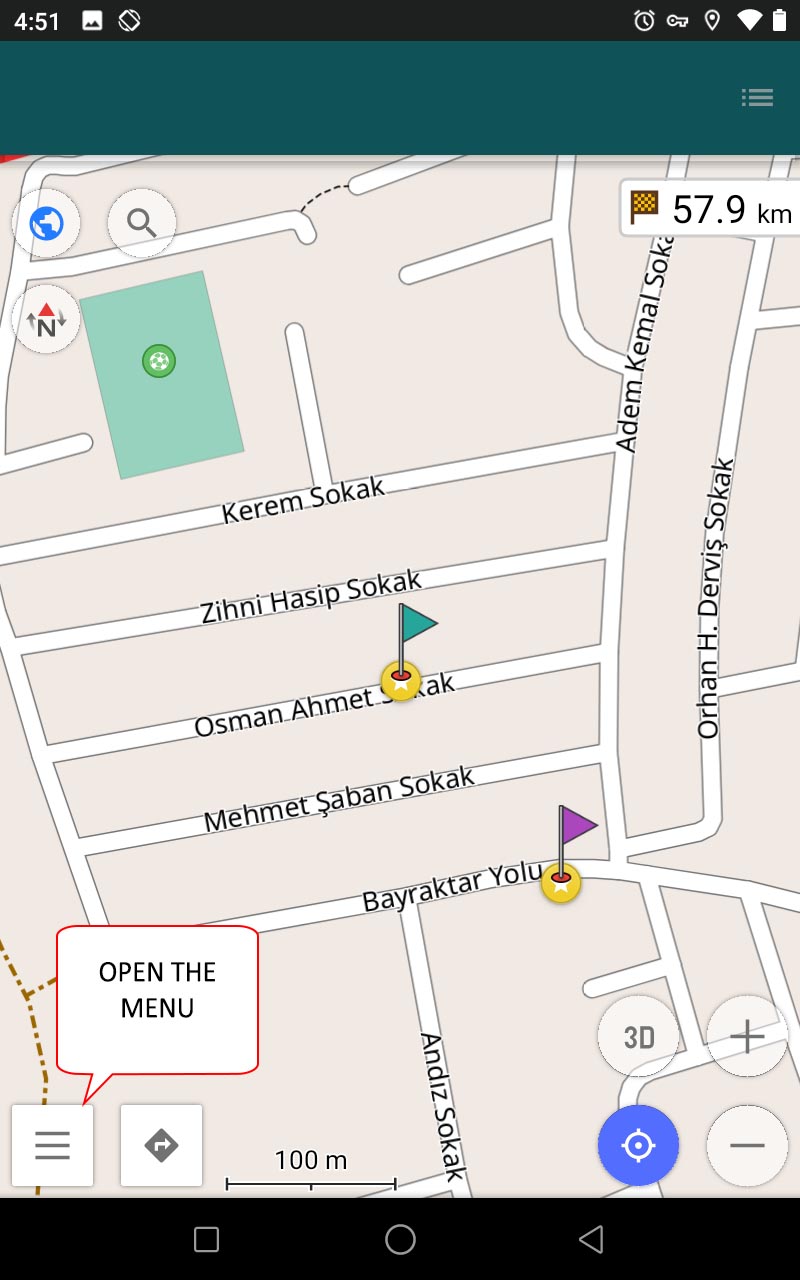
Make a flag for each location mentioned in the story, and double check that all flags have the same category name.
Resume the conversation
- Thank your storyteller again.
- Stop your recording on both recording devices.
- Pack up your copy of the consent form.
- Check that you take all your equipment with you.
Where Stories Meet Maps: Post-production
You have the recording and a rough map, now combine them and submit:
After a couple of hours, Otter.ai or Evernote will finish a draft of your transcript. There are ten steps to post-processing your transcript:
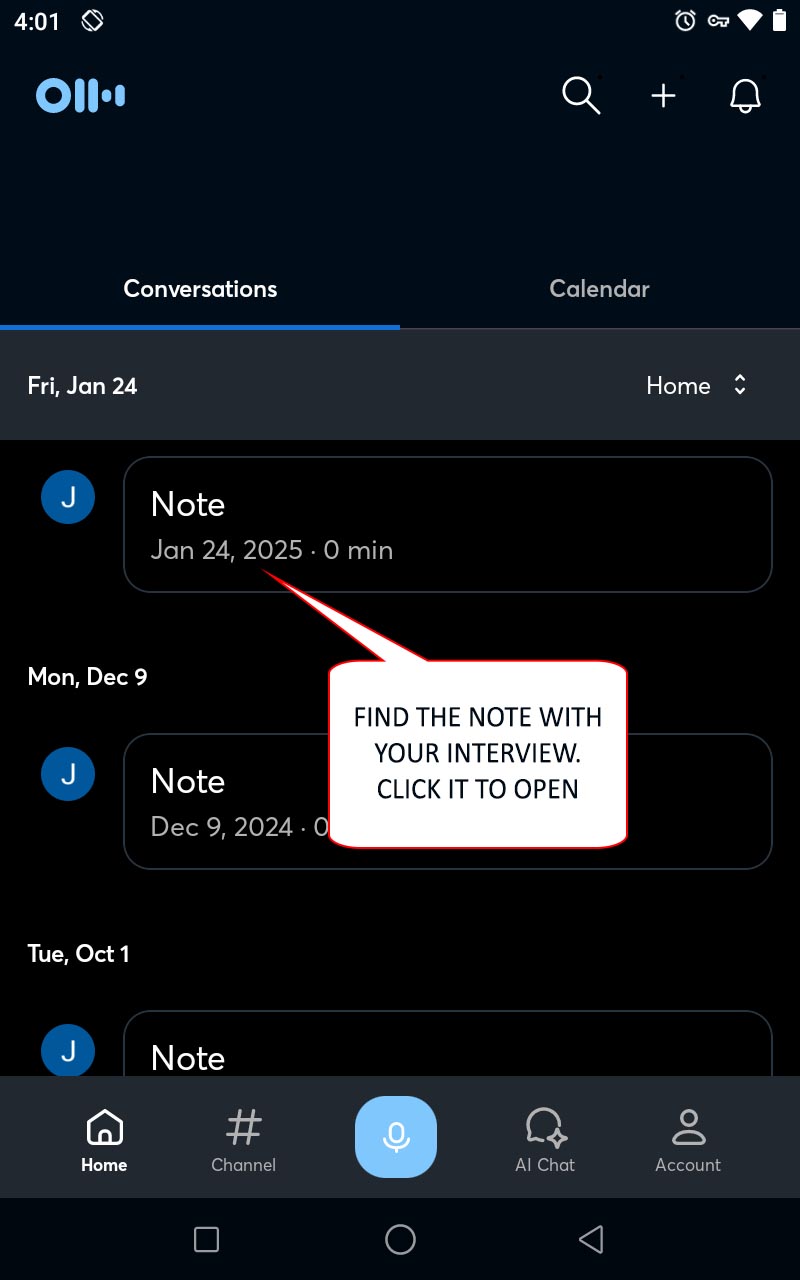
Step 1: Find your note by date when you reopen Otter.ai:
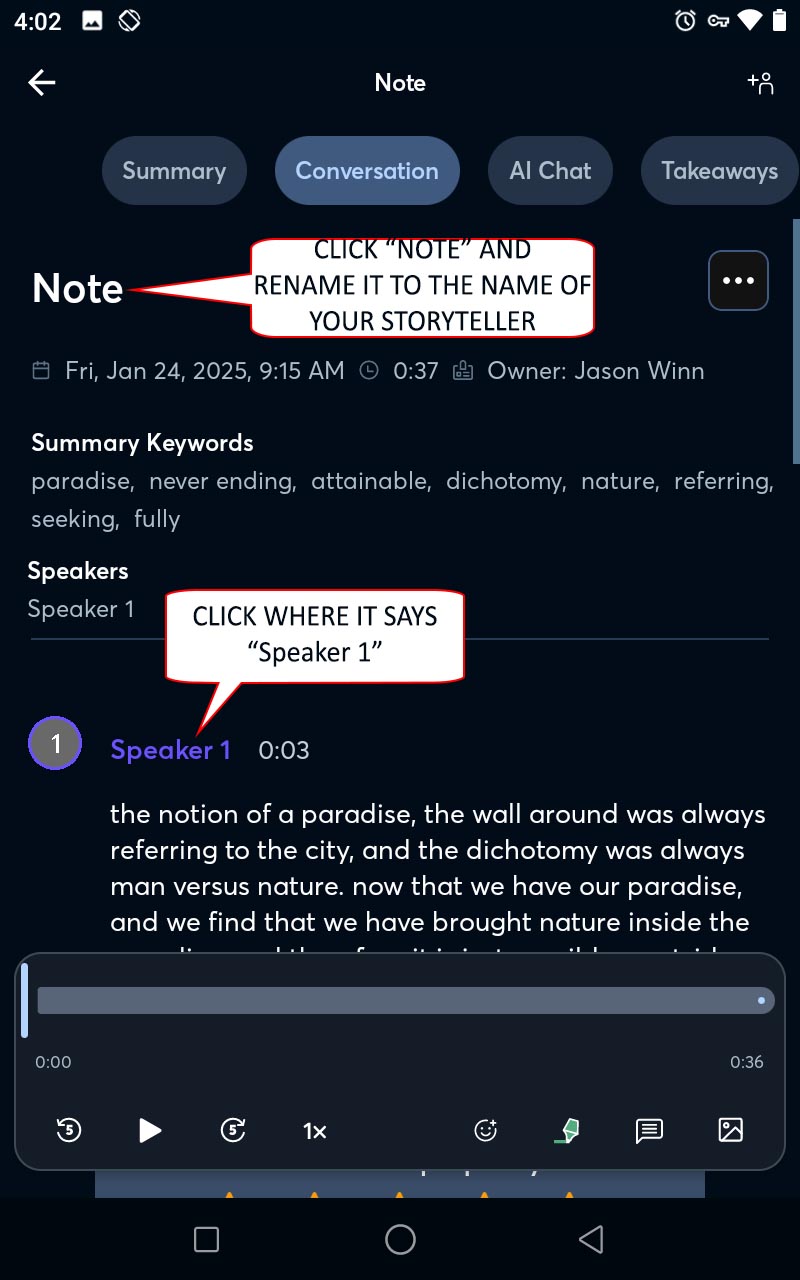
Step 2: Where it says "Note", change the name of the recording to the name of your storyteller.
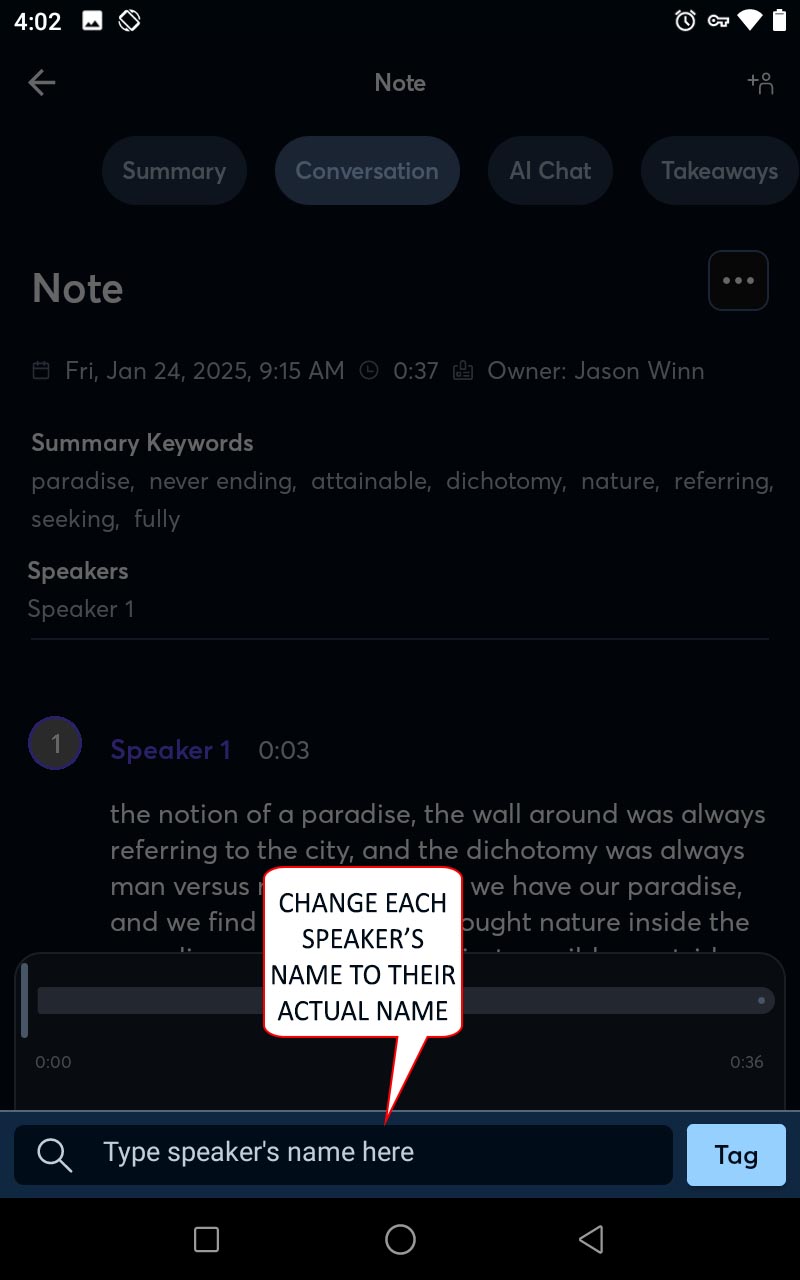
Then click on each speaker's number below and enter the actual name of the speaker:
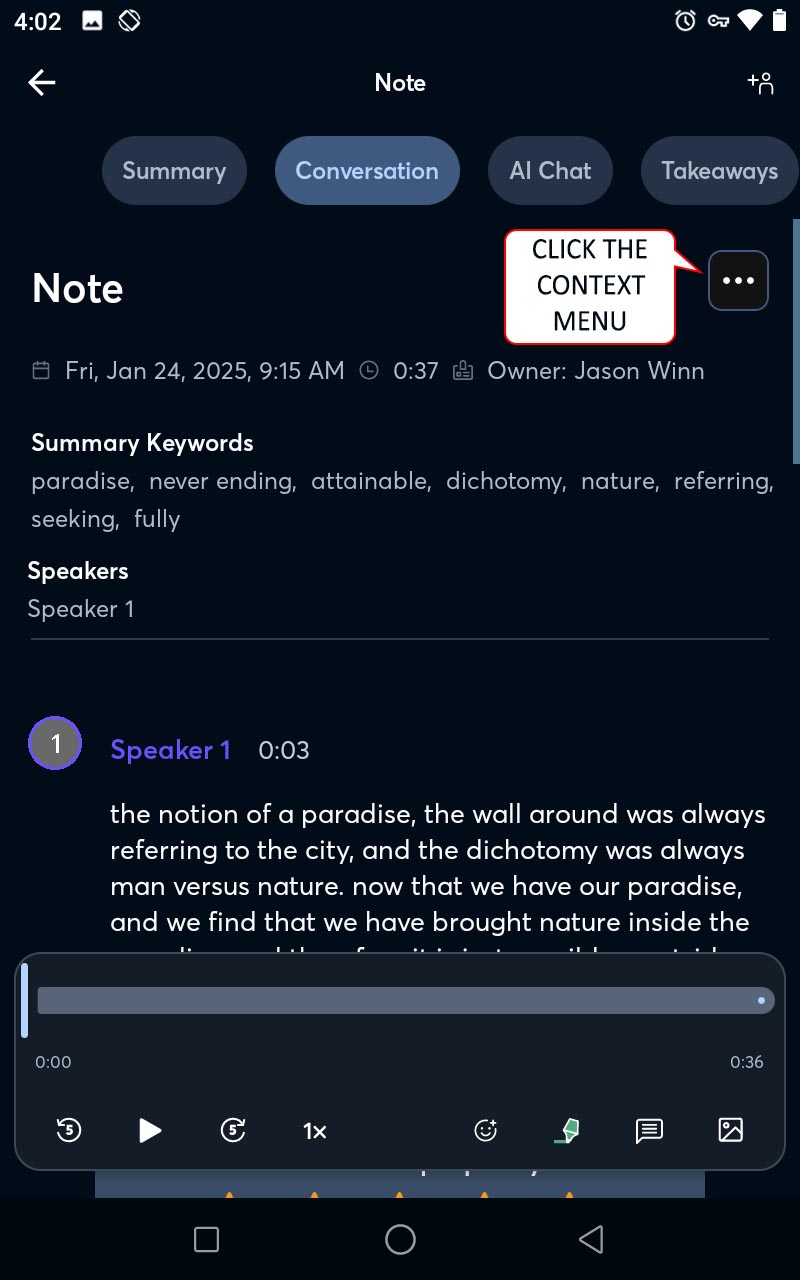
Step 3: To edit the transcript so the typed words match the spoken words, open the context menu using the three dots in the upper right corner:
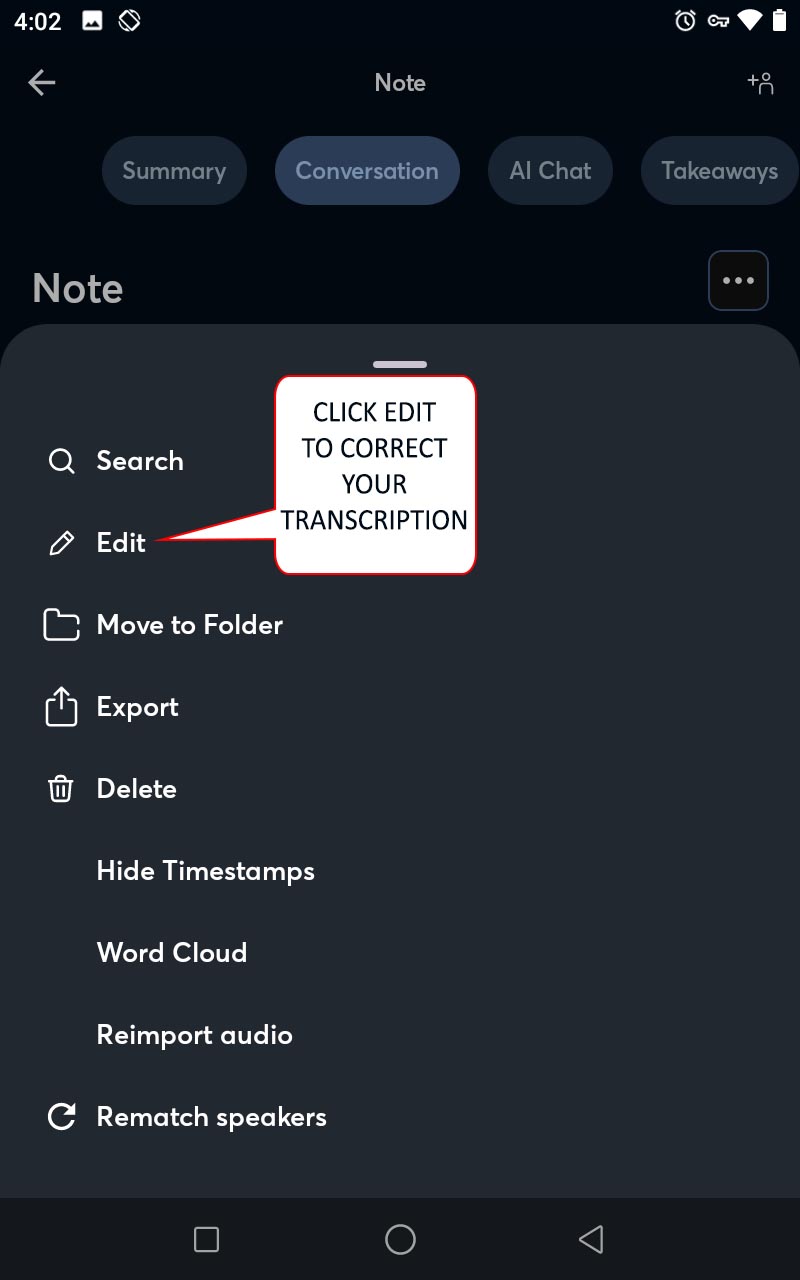
Step 4: Then select "Edit":
Step 5: Start and stop the audio play back with the play button in the upper right corner.
Pause the recording and select any word that you need to correct. When finished with all changes, tap the green check mark to save your edits:

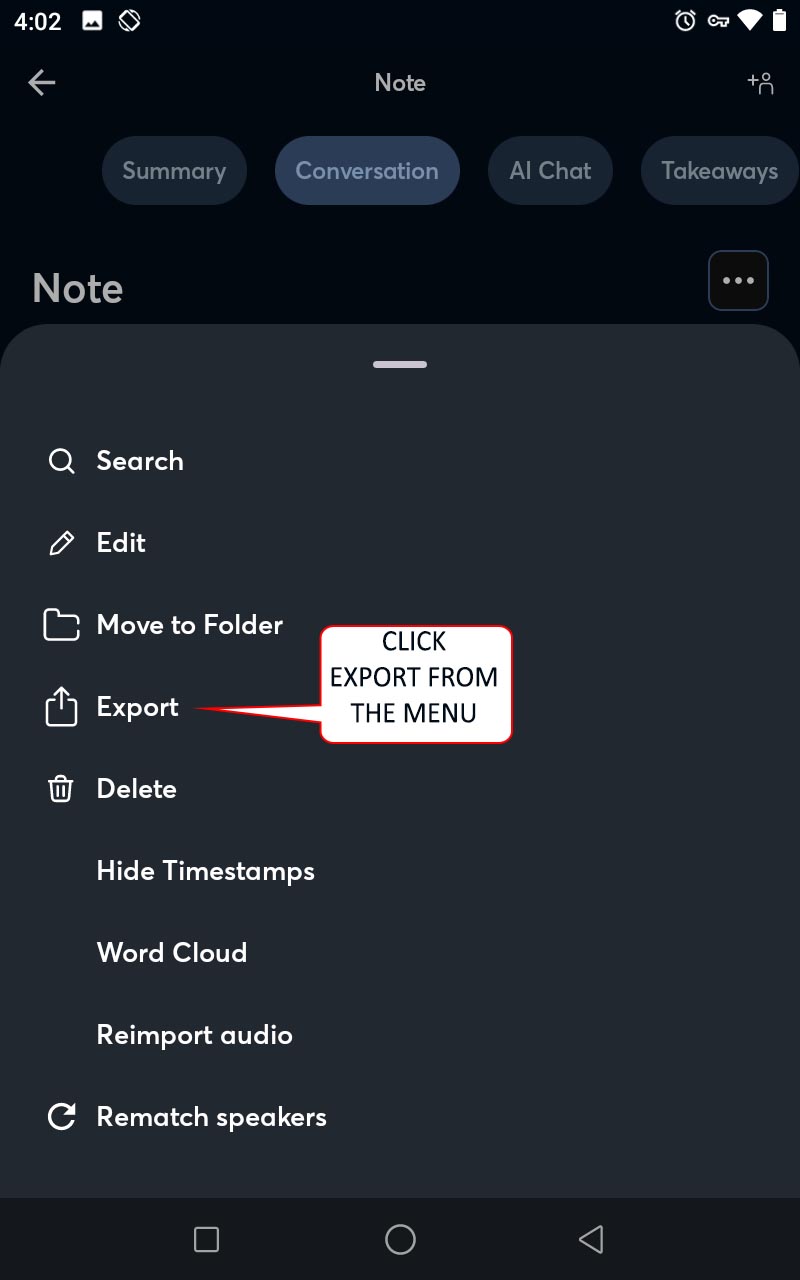
Step 6: To share the transcript, export it from the context menu:
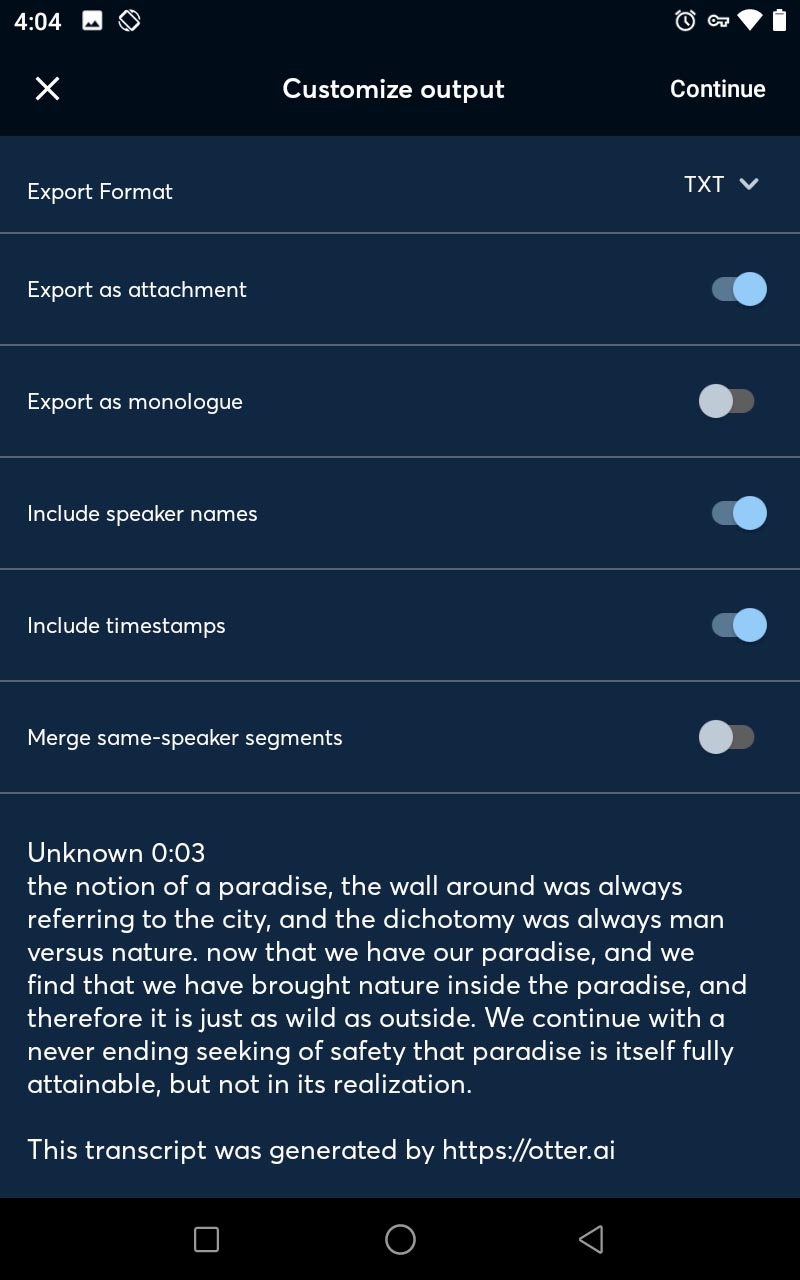
Step 7: Check that the settings match this image and save the text file in more than one place:
Step 8: Send the file to yourself and your teacher by email:
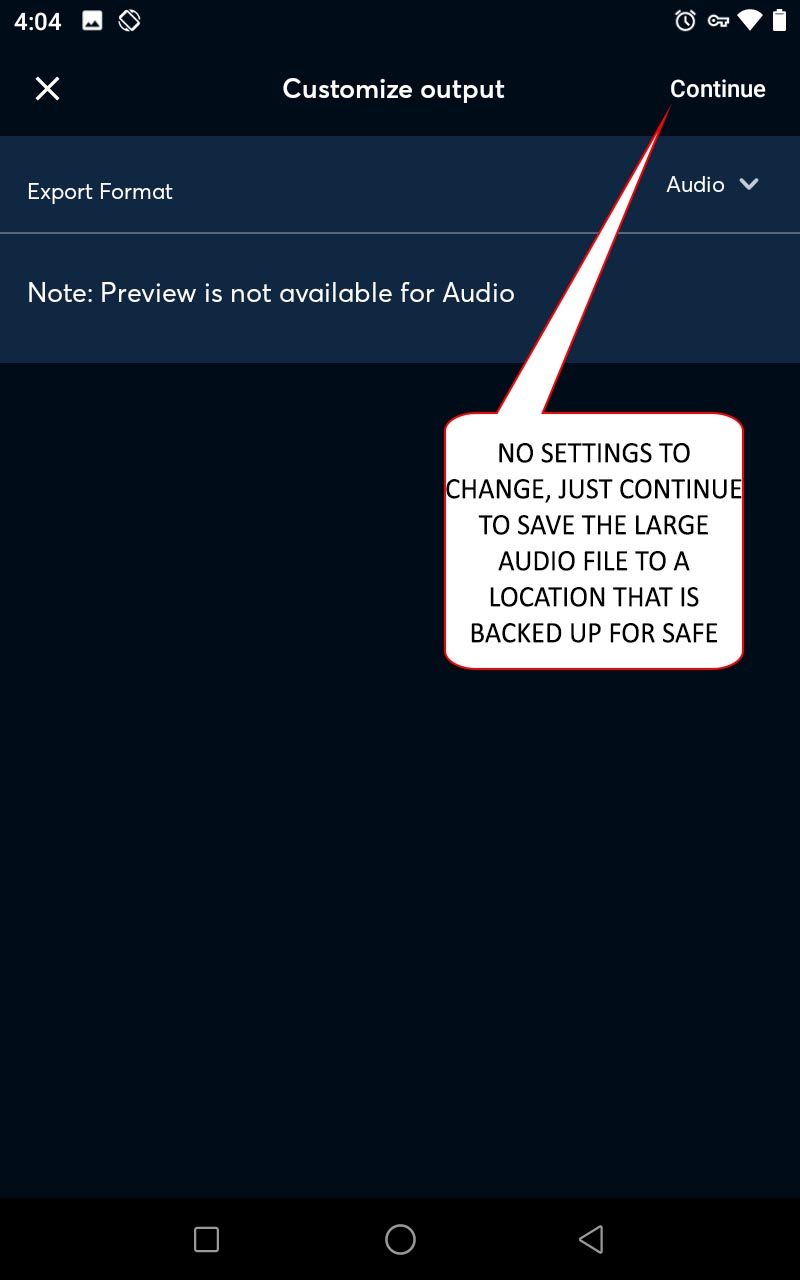
Step 9: Return to the context menu, select export again, but this time change the Type to "Audio":
Select continue to download the audio file of your interview. Save it in a safe place.
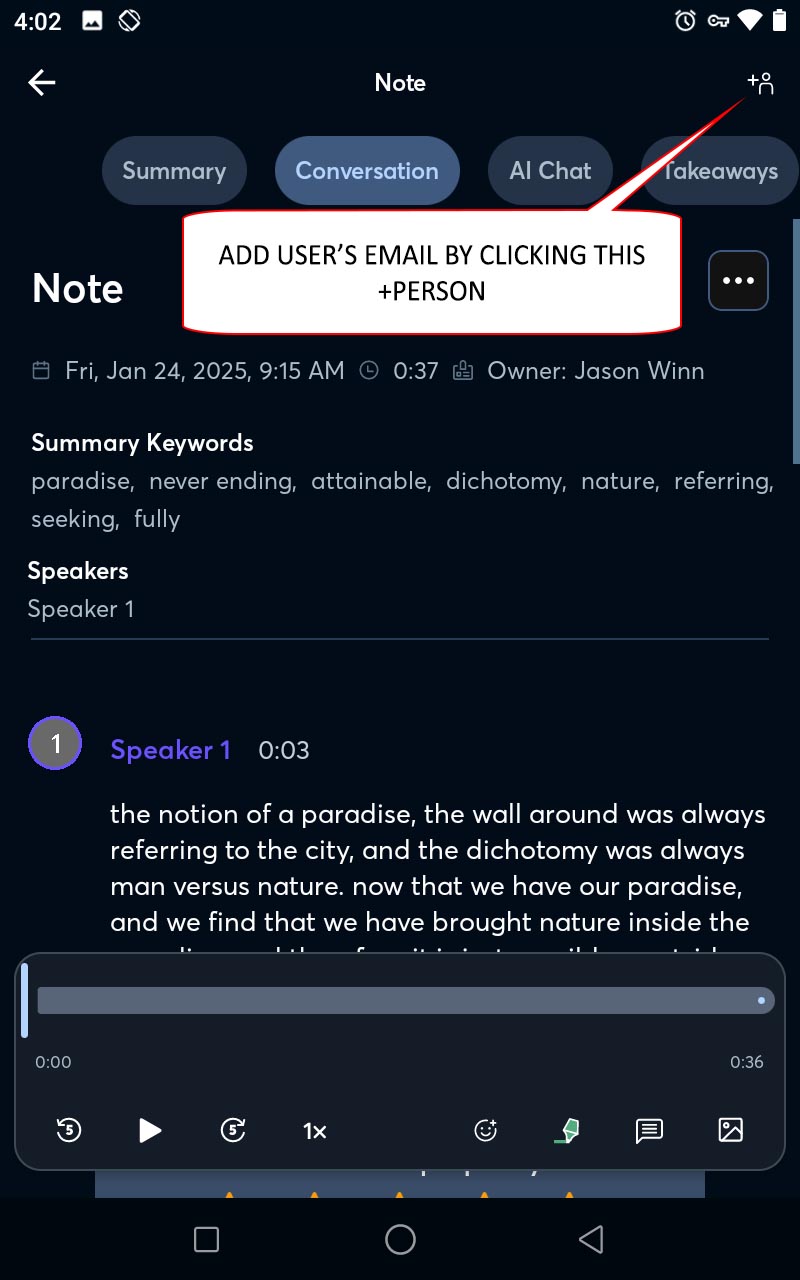
Step 10: Then add users to your recording.
Include
- your teacher's email address (if applicable),
- your storyteller's email address, and
- narrativeinfrastructure@gmail.com
Both of these files are important for many generations to come. Protect them! Store them in more than one location for safety!
Merging your transcript with your map takes four steps:
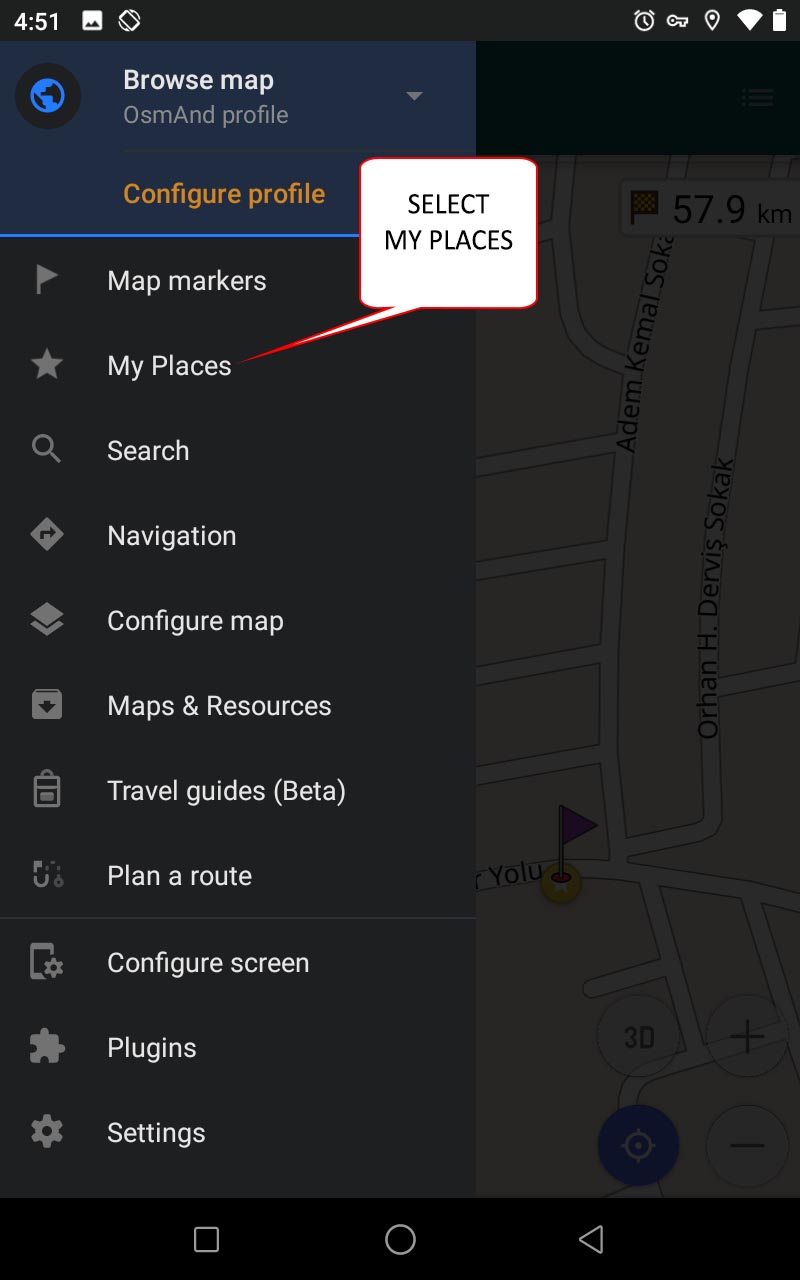
Step 1: Open your map menu:

Step 2: Select My Places:
Step 3: Expand the stories, and click on the first story:

Watch this video to get one part of your transcript specific to this one mapped location:
Merge Transcript with Map Tutorial
Step 4: Edit your story.
Where you see the number of the story, click and add a short phrase to describe the theme of that story. Remember_to_use_underscores between words, not spaces so your file is properly mapped.
Copy the text of that story from your transcript into the Description, keeping all names and time stamps.

Repeat step 4 for each story in your map.
Getting your finished Chat Map out of OSMand is the last part of making a Chat Map, and takes four steps
Step 1: Open your menu:
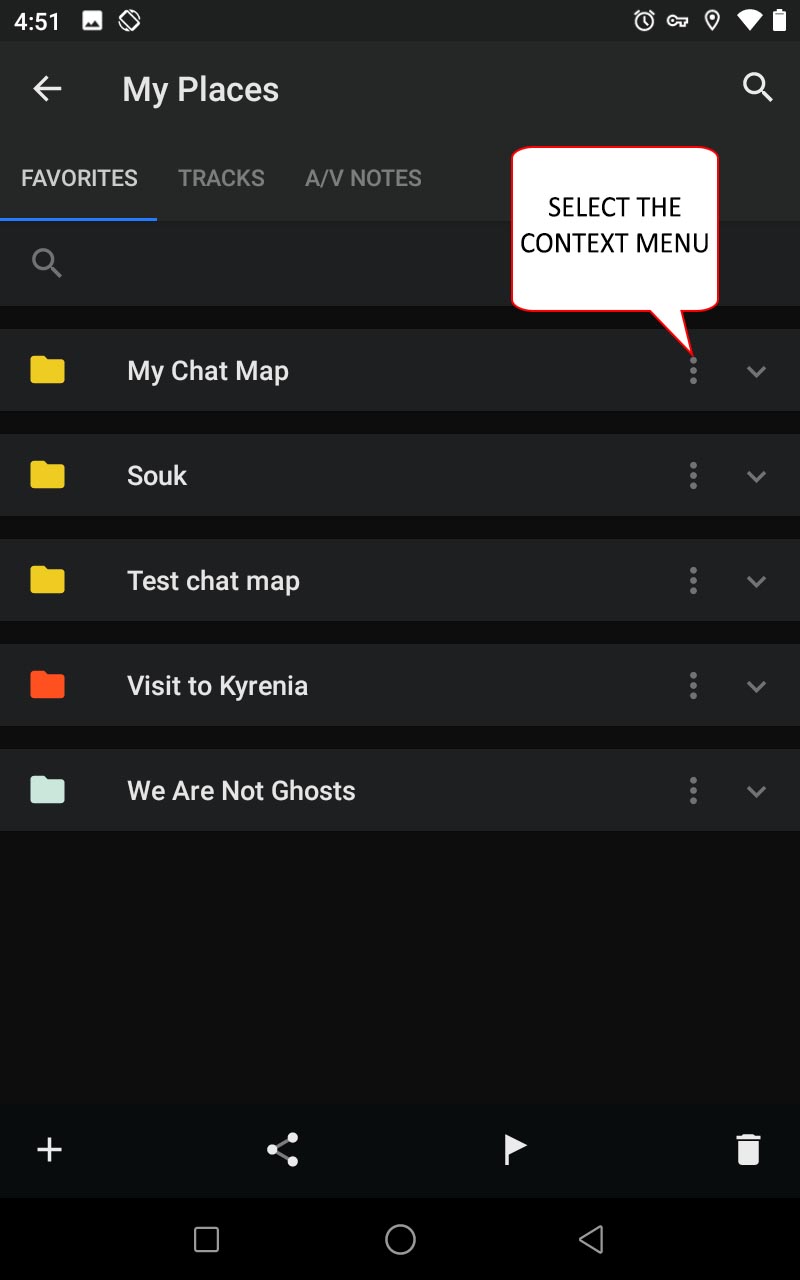
Step 2: Select My Places:
Step 3: Open the context menu next to the name of your map
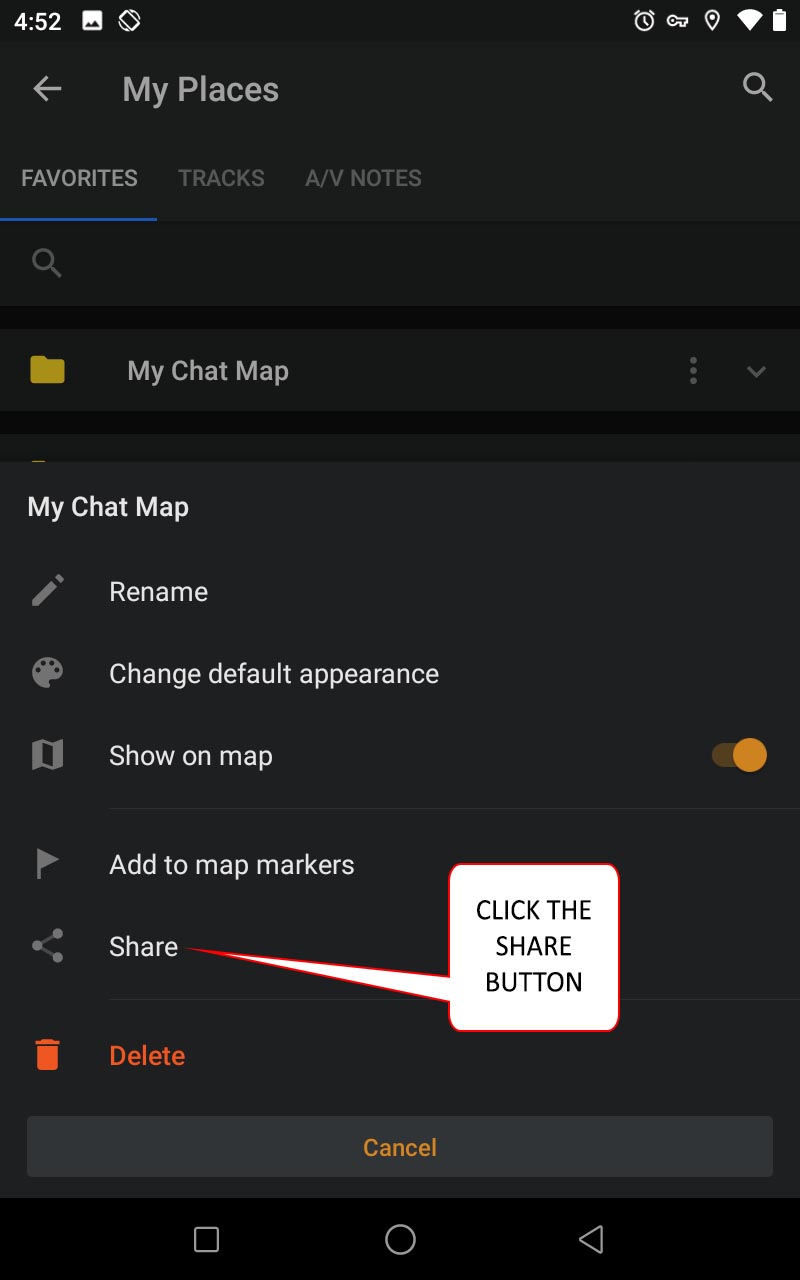
Step 4: Click the Share button
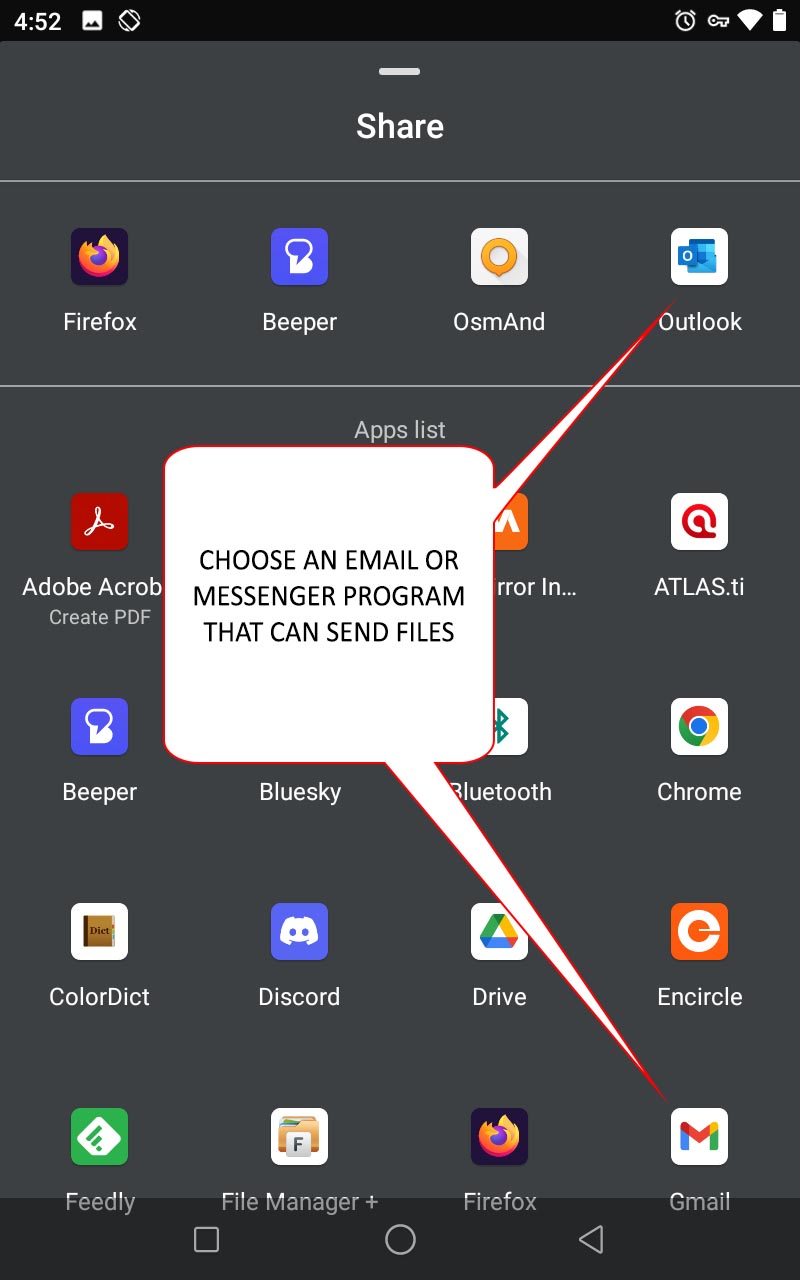
Step 5: Select your email application
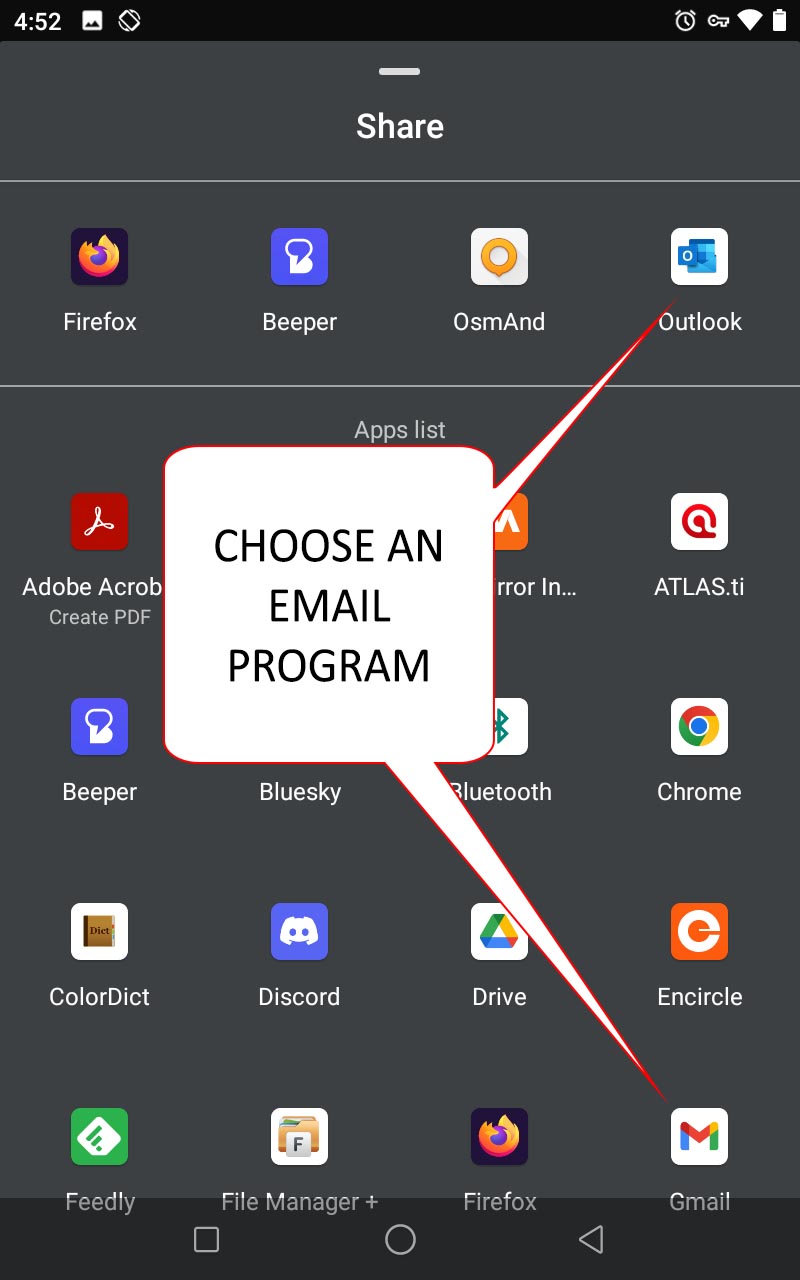
Email the file to the following people:
- Yourself!
- Your teacher
- narrativeinfrastructure@gmail.com
In the "subject" field of the email, include the following:
Your teacher's name, your name, your storyteller's name
CLICK SEND!
Congratulations!
Once we receive your Chat Map at Narrative İnfrastructure, we will add it to your community's growing map of stories.
When it is finished, you will receive an email with a link to your neighborhood's stories.
Please share the follow-up email with your storyteller so they also can see everything you accomplished together.
After a couple of hours, Otter.ai or Evernote will finish a draft of your transcript. There are ten steps to post-processing your transcript:
Step 1: Find your note by date when you reopen Otter.ai:
Step 2: Where it says "Note", change the name of the recording to the name of your storyteller.
Then click on each speaker's number below and enter the actual name of the speaker:
Step 3: To edit the transcript so the typed words match the spoken words, open the context menu using the three dots in the upper right corner:
Step 4: Then select "Edit":
Step 5: Start and stop the audio play back with the play button in the upper right corner.
Pause the recording and select any word that you need to correct. When finished with all changes, tap the green check mark to save your edits:
Step 6: To share the transcript, export it from the context menu:
Step 7: Check that the settings match this image and save the text file in more than one place:
Step 8: Send the file to yourself and your teacher by email:
Step 9: Return to the context menu, select export again, but this time change the Type to "Audio":
Select continue to download the audio file of your interview. Save it in a safe place.
Step 10: Then add users to your recording.
Include- your teacher's email address (if applicable),
- your storyteller's email address, and
- narrativeinfrastructure@gmail.com
Both of these files are important for many generations to come. Protect them! Store them in more than one location for safety!
Merging your transcript with your map takes four steps:
Step 1: Open your map menu:
Step 2: Select My Places:
Step 3: Expand the stories, and click on the first story:
Watch this video to get one part of your transcript specific to this one mapped location:
Merge Transcript with Map Tutorial
Step 4: Edit your story.
Where you see the number of the story, click and add a short phrase to describe the theme of that story. Remember_to_use_underscores between words, not spaces so your file is properly mapped.
Copy the text of that story from your transcript into the Description, keeping all names and time stamps.
Repeat step 4 for each story in your map.
Getting your finished Chat Map out of OSMand is the last part of making a Chat Map, and takes four steps
Step 1: Open your menu:
Step 2: Select My Places:
Step 3: Open the context menu next to the name of your map
Step 4: Click the Share button
Step 5: Select your email application
- Yourself!
- Your teacher
- narrativeinfrastructure@gmail.com
In the "subject" field of the email, include the following:
Your teacher's name, your name, your storyteller's name
CLICK SEND!
Congratulations!
Once we receive your Chat Map at Narrative İnfrastructure, we will add it to your community's growing map of stories. When it is finished, you will receive an email with a link to your neighborhood's stories. Please share the follow-up email with your storyteller so they also can see everything you accomplished together.Make a Folder Tutorial
(jump to time marker 44 seconds)